


I became entranced by silverpoint drawing simply by looking at many of Da Vinci’s drawings done in silverpoint. Today, one does not hear about this graphic technique very often as it is not commonly used, despite it having been around for about 600 years. Silverpoint is considered to be one of the most challenging of all graphic mediums. Marks made with silverpoint can never be erased once put down on paper, so no reworking is possible!
What is silverpoint?
Silverpoint drawing is with a silver wire that is held within a mechanical pencil, or other type of holder. With the help of the internet, it is easy to find and quick to prepare. As a new drawing the lines you make will look blue gray in color. However, since silver tarnishes, the color will turn brown over time. Often this tarnishing is desirable as it gives it a very characteristic appearance.
The fact that silverpoint cannot be erased can be seen as both a good and bad thing. Bad in that you are never able to correct yourself and your errors are there for all to see ;-). Good in that you can see the cumulative effect your drawing takes on! Also, nobody can ever erase your drawing away! So, the good far outweighs the bad with this graphite technique 🙂 And, who wouldn’t want to use the same type of technique that artists also used hundreds of years ago.
How to prepare your paper for silverpoint drawing
Unlike graphite, silverpoint requires special surface preparation
If you try to draw on a raw sheet of paper you will likely only make indentations into the paper. This is because the metal is too hard to make any traction onto the paper. Graphite is much softer, which is why it is able to make a mark on raw paper. When a coat of gouache is applied to a piece of paper, there is enough tooth for silverpoint to make a mark on the surface.
Preparing a surface for silverpoint drawing
- Stretch some acid free watercolor or drawing paper and coat it with zinc white gouache or watercolor. Silverpoint draws well on this kind of surface. One or two thin coats of gouache should be enough. You can also use the Golden Silverpoint Drawing Ground shown below.
- Simply wait for the coating to dry completely before drawing.
Materials needed for silverpoint drawing
Not many materials are needed for you to start to your silverpoint drawing! Below are the silverpoint drawing tools you will need.


A note on store bought surfaces used for silverpoint drawing
There are surfaces/paper available for purchase but these tend not to be archival. It is best to prepare your own surface as outlined above. You can even make a tinted ground yourself by tinting the gouache (or silverpoint ground) if you wish to do so.
How to use silverpoint
Before drawing with silverpoint, try to round the edges of the point of the silver wire. You can achieve this by making some broad strokes on your paper and after it is rounded it will be ready to properly draw with!
Silverpoint drawing is best for smaller scale drawings, due to the delicate nature of the medium. It is not meant to be used in broad strokes on large surfaces. You can certainly try it though!
As well, it cannot reach a dark value range as its deepest tone is a mid tone. Silverpoint is predominantly considered a linear technique as it does not lend itself very easily to shading. A shading effect with silverpoint, can be created with cross hatching and laying down lines close together. This line hatching to create shadows can be seen in the image below of one of Da Vinci’s drawings.
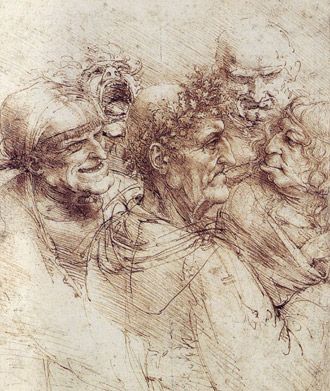
Cross Hatching and Line Drawing
Here is one of Leonardo Da Vinci’s silverpoint drawings. Notice the cross hatching over the clothing of the individuals and how it builds up in different areas of the drawing. He was able to get a surprisingly dark value out of his silverpoint in this drawing by building up several lines over time. There are numerous drawing lessons from Da Vinci that we can learn from but this nuance of drawing with silverpoint I think is particularly special.
A different example of an absolutely exquisite drawing by Rogier van der Weyden. Is clear that he is using the delicate quality of silverpoint to its full effect. The combination of the piece having a delicate clear line quality with the entire image being in a high key makes for a beautifully sensitive combination.

Thanks for reading! Please comment below if you have any thoughts or questions about drawing with silverpoint. If you’re looking for ideas of things to draw, that would fun to try in silverpoint as well, here is how to draw a rose. For additional drawing resources, here is a list of some of the best drawing books for learning how to draw or an article on drawing tips for beginners.


19 thoughts on “Silverpoint Drawing Guide And Necessary Materials”
Just finished a course in silverpoint. I am “hooked” on this medium. I am a professional artist and wanted to add to my techniques and mediums. Portraits & people are my favorite subjects.
That is so awesome! How wonderful that courses are being offered for silverpoint – I think it is a great technique and skill to add.
In the drawing by Leonardo I can’t see any “cross hatching” but only hatching. Hatching has a stronger role in showing contours, but in a way, requires a bit more discipline.
..
Hi Janet, Thanks for all your lovely comments and contributions here. It is a little difficult to see in the image as one can’t zoom in on it. But there is cross hatching in the darker value areas – you can notice it best in the man with the open mouth. The cross hatching is what helped to make those areas darker in value. The cross hatching isn’t everywhere as the hatching is – but only in select areas.
I’ll look again. I’m seeing this on my phone, so I’ll look for a larger image. I do love silverpoint…both in process and to look at.
DE VERDAD EXCELENTE TECNICA, Y SOLO LA HE LEIDO…FELICITACIONES SINCERAS POR SU GRAN DESTREZA Y SU REGALO DE CONOCIMIENTOS…
Thank you very much! I am glad the information here is helpful and you have enjoyed it.
Thank you for the silverpoint information. My questions are, will the silverpoint tarnish over time even if I try a toned or colored ground to my support if I’m adding a darker color to the white? Can I use titanium white watercolor or permanent white gouache? It’s what I have on hand. Can you paint around the drawing after it’s complete to add more color without covering the drawing to allow it to tarnish? Thank you so much! I’m excited to try this medium again!
Sincerely, Andrew Hazelton
You are so welcome! Am glad this was helpful. Good question – I have not tried those methods myself to see how it would turn out. However, I know that silverpoint drawings will tarnish to a warm brown tone (Leonardo da vinci’s drawings are a good way to see what silverpoint drawings look like when tarnished). As the color it turns to is a warm brown orangey tone, you could try to draw on a blueish (complementary color to orange) support as this might make it look less tarnished. You should be able to paint around the drawing after it is complete. If you don’t want to cover the drawing, then try to use more transparent colors. Enjoy using silverpoint!
It is better to use color first so that it is under the silver. Even so, be careful not to overwhelm the silver with strong color. I don’t think color over the silverpoint will keep it from tarnishing unless it’s thick, but it will certainly hide the shine. If you DON’T want tarnish, you can use a different metalpoint such as aluminum or gold.
Hi Elisabeth
Stumbled on this and revived my long past memories. I made about three or four drawings using this thechnique. It went on like this:
From what I read long time ago how this works I thought that this is something like how a sandpaper works. So….diy a sandpaper (sic) large enough for the drawing usually about A2. Mix some white glue (PVA) with marble powder which I hoarded when we had marble work going on in the house, add some water to dilute it to paint consistency.
Stretch a damp cartridge paper and fix it to a board. Paint witht the prepared thing. Dry. Add another coat making sure that it is as smooth as possible. When absolutely dry start drawing.
As I had no silver wire (I wanted to start as soon as possible otherwise I could have made some diy silver wire using a short length from a silver block used for filogree back then). So I used copper wire which is plentiful. The result is a pleasing reddish drawing. Used aluminium wire too which is not unlike silver but does not tarnish.
Anyone can have a try with these simple materials. Lenghty job but satisfying.
Thank you so much for sharing this information Joe! Enjoyed hearing how you were able to make use of simple materials. Also, good to know that aluminum wire works as well.
Thanks for the info on Silverpoint drawing, never heard of it before.
Drawing is my thing and eager to try it, Cheers. Terrie, Australia.👍
P.S. wasn’t Leo a fasinating bloke!
You are welcome Terrie! Glad that you are going to give silverpoint drawing a try – it can give such beautiful results! Yes, Leonardo was such an incredible person – am thankful for all the beautiful work he left behind!
This is fascinating! I never knew it existed. Thank you!
You are welcome! 🙂
I’m new to silverpoint drawing, and I’m having a problem getting started. After placing a length of 18 gauge deadsoft pure silver wire into a pin vise and dragging it across the surface of an Ampersand Claybord, it left no mark at all. What am I doing wrong?
My guess is that the clay board isn’t “toothy” enough. The mechanics you want is that the “support” should take “microbits” of metal off the “stylus”. Example, graphite is so soft that ordinary paper grinds off a bit with each stroke until so much is gone that the pencil needs a new point. Silver is harder so it needs a support that has a roughness strong enough to take off a bit of the metal point. ( That roughness and those bits are microscopic.) Anyway…try your wire on an unpainted plaster wall, or a piece of paper meant for pastel drawing….or for silver point! And if you like it, invest in a mechanical pencil with a chuck action of the correct diameter to hold the wire. ($10-15)
Thank you for the informative information about Silverpoint drawing. I am very interested in giving it a try. I love to draw.