

There is always a great deal of curiosity around old master painting techniques and how to replicate them. The work they created was so incredibly high level and beautiful−that it is difficult to imagine how it was created. And they managed to do it all with far fewer materials and tools than we have today… So, how did they pull it off?
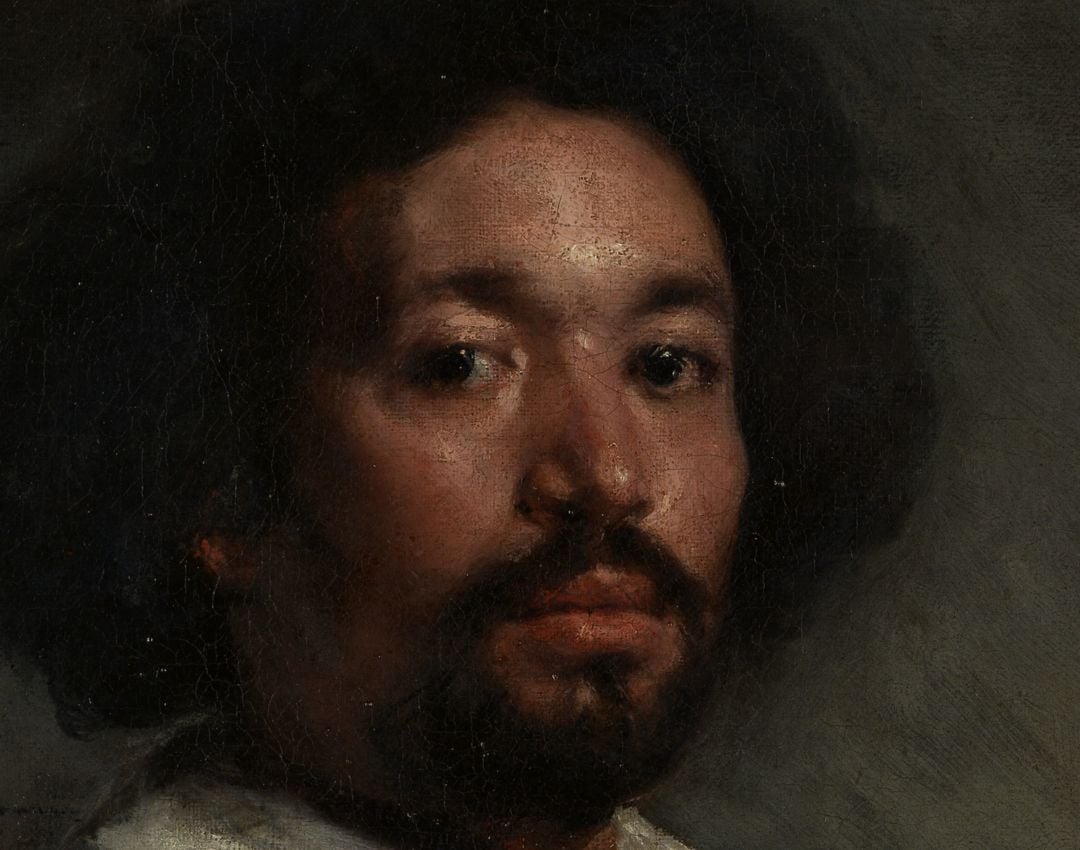
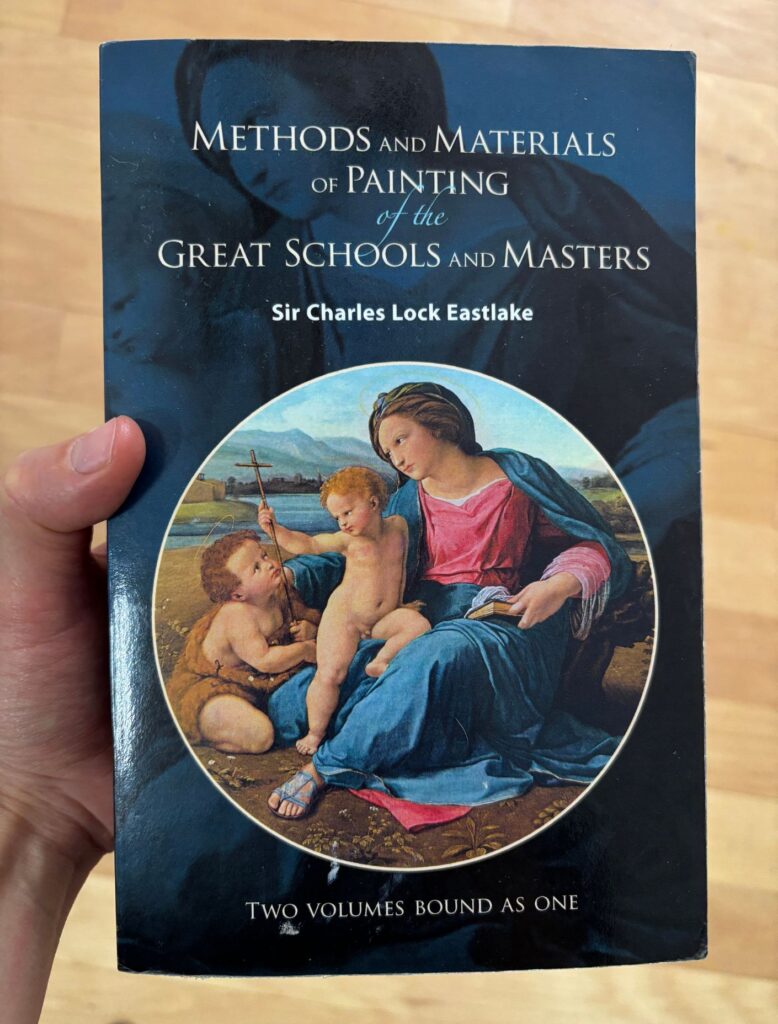
While we don’t have videos of Caravaggio or Velázquez painting, we do have the next best thing—Sir Charles Lock Eastlake’s Methods and Materials of Painting of the Great Schools and Masters. After decades of research, Eastlake documented many of the techniques and materials used by the old masters, giving us a rare window into how they worked. Let’s take a closer look at what went into the creation of these master artist’s work!
Materials are key to understanding old master painting techniques
Let’s begin with the raw ingredients, because as Eastlake keeps reminding us, “the materials” matter as much as the techniques.
Key pigments in use:
- Lead white (flake white): the backbone of highlights, tints, and modeling
- Earths (ochres, umbers, siennas): for stable middle & shadow tones
- Vermilion, red lakes: for reds; lakes (organic reds) often reserved for transparent glazes
- Azurite / Ultramarine: for blues (ultramarine being costly)
- Verdigris / copper greens, orpiment, etc.: more exotic greens / yellows, used carefully
- Carbon black / lamp black: deep darks, underdrawing, mixing with other colours
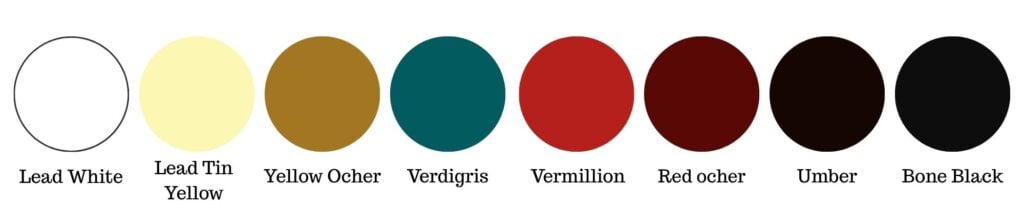
The sheer number of pigments available and used at the time is paltry in comparison to what we have available to us today. Clearly this did not hinder their work at all. The beauty of this limited palette lies in its simplicity.
The masters achieved endless variation by how they layered these colors — not how many tubes they owned. Their knowledge of color was strong, so they were able to really mix whatever color they needed. This only highlights the powerful and really understanding how color works in a practical way on the color mixing palette.
The Foundation: Ground, Underdrawing & Underpainting
At this time, artist’s either worked on wood panels or oil primed canvas. As acrylic primer didn’t exist back then!
Before beginning, 16th and 17th-century artists would start their painting, they would make a toned ground on the surface of their painting. This would involve making an imprimatura. Many of these old master painting techniques—like starting with an imprimatura—are still used by painters today. And are fundamentals that I always teach my students as well!
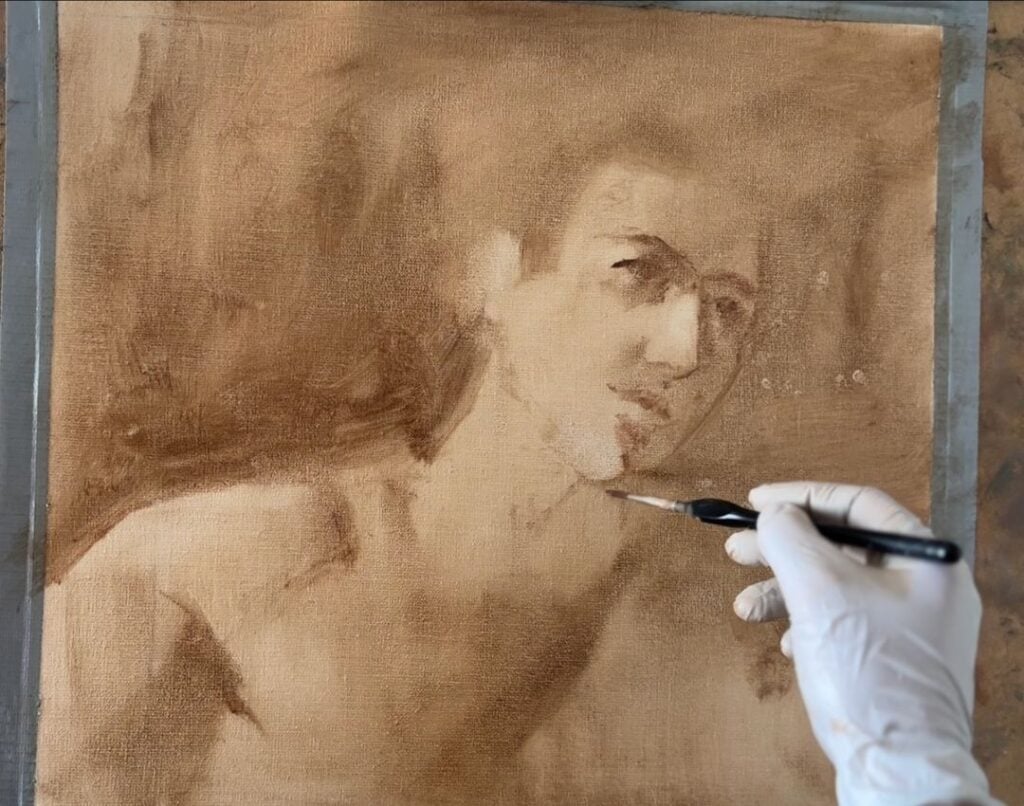
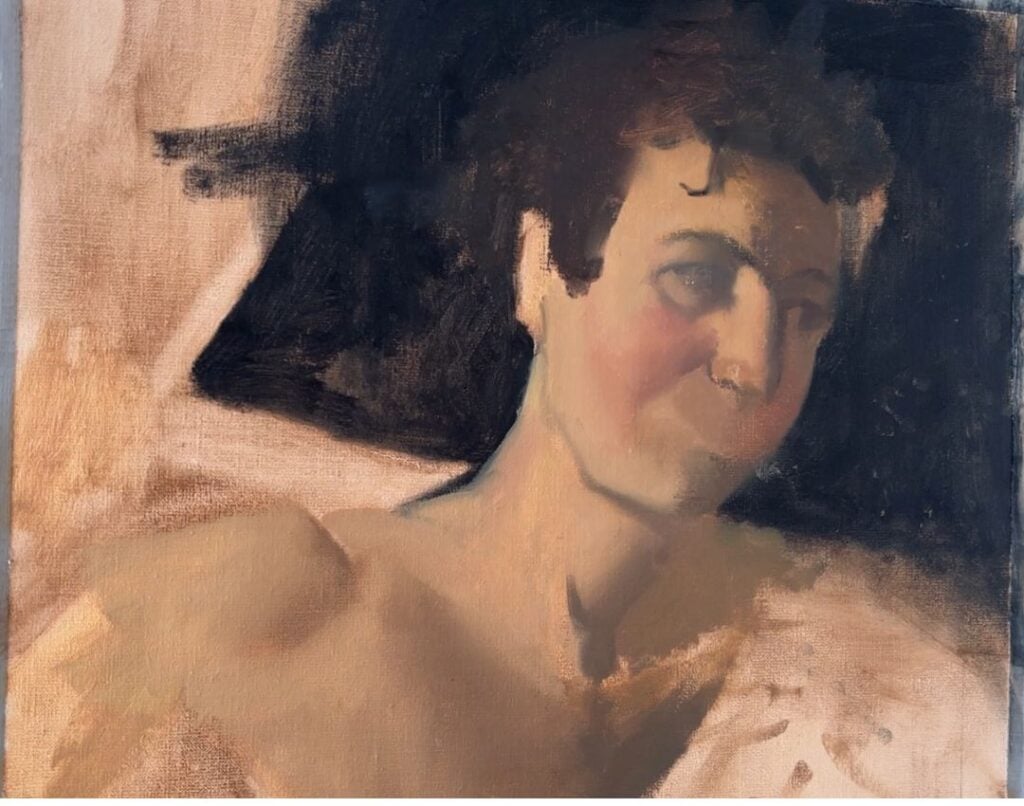
They often started with a loose underdrawing in charcoal or thin paint, followed by a dead-coloring stage — a monochrome or earth-toned underpainting that established the composition and values.
This early work wasn’t detailed — it was about capturing light and shadow, not perfection. The form came gradually. They would make sure they kept the strong light and dark values in their painting throughout the entire process from start to finish.
Painting in Layers: Building Depth
Artists of the 16th and 17th centuries worked in carefully planned layers, each serving a purpose. We already outlined the initial layer of underpainting. Now we enter into the early opaque stages to build solid form and light.
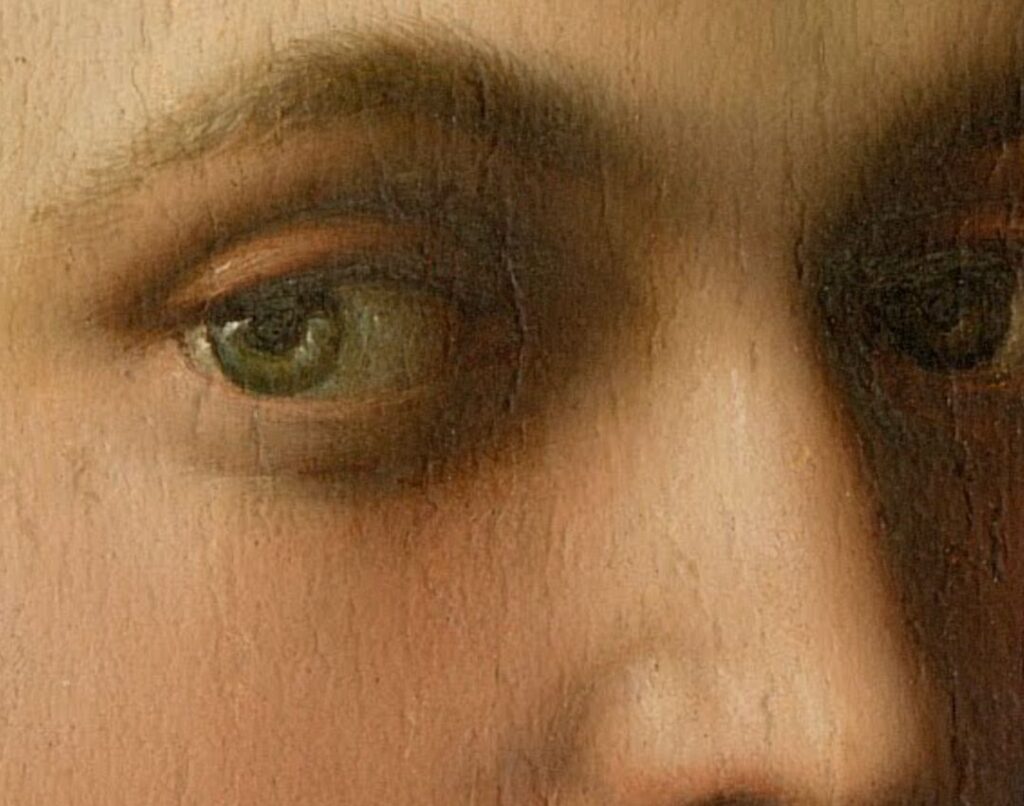
Layering was central to old master painting techniques, helping create that inner glow we still admire today. Eastlake noted, the masters were “systematic in their succession of processes,” understanding that beauty and permanence depended on this order. By layering, they avoided muddiness and used oil’s natural translucency to their advantage — letting light pass through the upper layers and reflect back from the opaque ones beneath, creating that unmistakable inner glow of old master painting.
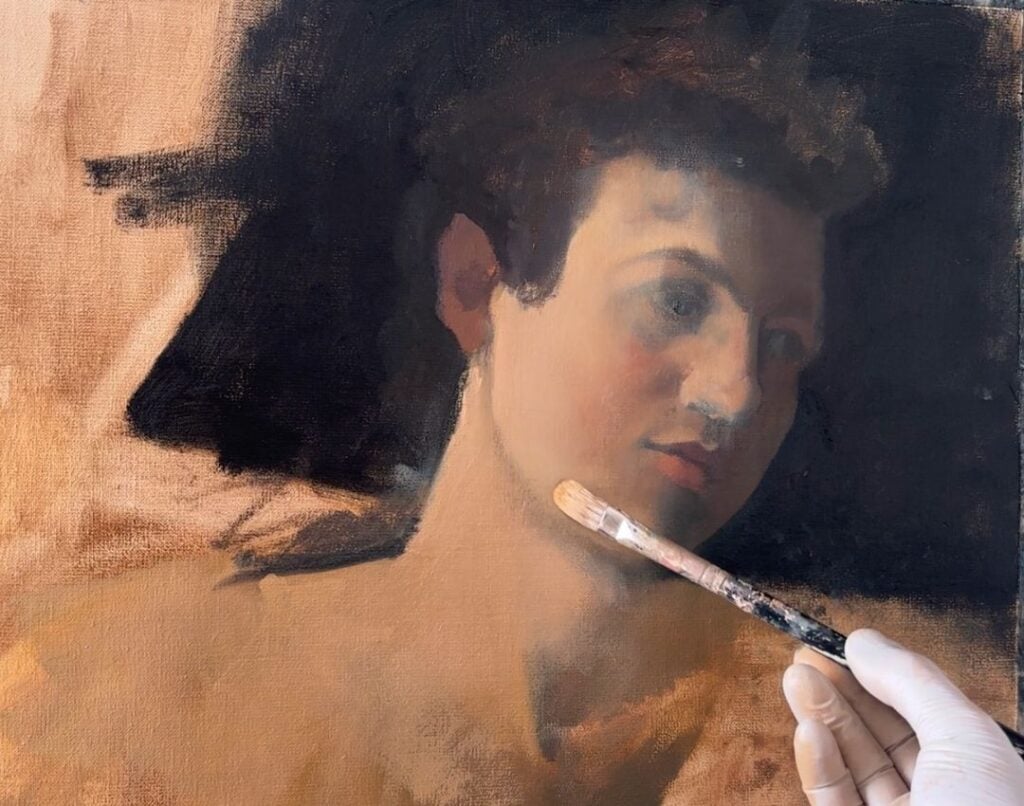
Opaque modeling (building the form)
Once the underpainting was complete (and dry) artists would start to build their form with opaque modeling. They would use denser paint (often lead white and earth pigments). During this stage they would be able to establish solid light and dark masses which would give strong form to the painting.
Glazing can ONLY give depth and richness if they sit over something that is already structurally firm. So, therefore this step of creating an opaque paint layer is crucial for what comes later on.
The Real Magic Tools – Glazing & Scumbling
If there’s one secret weapon of this era, it’s glazing.
Glazes are thin, transparent veils of color laid over dry paint. Light passes through the glaze, reflects off the opaque layers beneath, and bounces back — creating that luminous, almost inner light quality. It is an indirect painting method that uses layers as opposed to the direct painting methods that came later with artists such as Van Gogh and Cezanne.
Use glazing to:
- Deepen shadows
- Warm flesh tones
- Adjust color harmony without repainting
By contrast, scumbling is like the opposite technique. It’s a semi-opaque lighter color brushed over darker paint to soften edges or add atmosphere. It’s how painters created hazy light, distant air, or soft transitions.
Eastlake admired these systems but cautioned balance:
“Sharp touching, scumbling, and glazing… the chief requisite is to restrict the number of pigments.”
In short — don’t overdo it. A few well-placed glazes or scumbles can transform a painting. Too many can flatten it.
Applying these methods today
The techniques of the old masters can often feel distant and out of touch. However, it is very accessible to implement some of their practices in your own work. Especially the beginning underpainting stages of the painting process. Such as making an imprimatura and an underpainting.
Next, I encourage you to experiment with glazing and scumbling – especially if you have a strong handle on value and color. Even if you love direct painting and expressive brushwork, it will only be to your benefit to have more techniques to draw from. You never know the situations and moments you find yourself in where indirect painting (such as glazing and scumbling) methods might be useful.
A Final Thought from Eastlake
Eastlake spent decades studying how painters of the Renaissance and Baroque eras prepared their materials and built their images. What’s striking is his reverence for craft — and restraint.
“The beauty of old painting does not depend on complexity of materials, but on the perfect use of simple ones.”
That’s a timeless reminder. You don’t need dozens of pigments or fancy mediums — just a few well-understood colors, a solid sense of value, and a willingness to let light build slowly through layers.
That’s the lasting legacy of the old master painting techniques: patience, simplicity, and light built layer by layer.
What of the old master techniques stand out to you personally? Would love to hear from you in the comments below!
Want to remember this? Save these Old Master Painting Techniques to your favorite Pinterest board!


18 thoughts on “Old Master Painting Techniques: Timeless Methods that Still Work”
Very useful article, I searched on internet for the book of Sir Charles Lock Eastlake’s Methods and Materials… and foud it on internet archives, there are impressive 580 pages, I read some of them. The beginning underpainting stages example I hope I try my self, with few colors.
Thats awesome you found it on internet archives – free! It really is an incredibly useful book and so great to get to have information that someone dedicated decades to putting together in a volume. It is very dense reading – but very valuable.
Your post is so timely for me. I am beginning to use oil paints rather than acrylic. Paring down the number of tubes I own to start with the old basics. Thank you for demonstrating how the Masters used so few colors with such beautiful results. I look forward to your demos!
So glad to hear that!💙 And wonderful that you are beginning to use oil paints. Thats great that you are paring down the number of paint tubes you will use. I personally started painting with a very limited palette when first learning how to paint – I learned a LOT about color by seeing how many different kinds of colors could be mixed with so few!
Another interesting article. As others have suggested, a demonstration of how to glaze and scumble with oil paints would be very helpful. I have found your previous comments etc on the value and range of a limited palette incredibly freeing and helpful in learning how to mix colours. This is especially helpful when travelling and in pleine air painting. The comments on using opaque paint underneath is also interesting. I am particularly interested to understand more when to use titanium white (opaque) and a semi transparent white (and which one) that allow colours to show more.
Thanks
Yes, working with a limited palette really can be freeing. As it allows you to focus on value more and then add in more color slowly as one becomes more and more comfortable with it. Glad to hear that you would also like to see a demonstration of glazing and scumbling. I will definitely be doing a demo in the future – hopefully sooner than later! In regards to using opaque and transparent whites – as a general rule I often use titanium white in the very beginning stage of a painting but then move onto cremnitz white as working with more nuanced colors becomes more important. But this is not a hard and fast rule. This is also a good topic I plan to touch on more in future demos.
Thank you for this information. Would love to see a demonstration; would be so helpful. Super article.
Glad you enjoyed the article! Thank you for your kind words. I do plan to do some demonstrations of this in the future with my youtube channel 🙂 so coming up!
I admire my grandmothers use of a very limited palette. In the painting of a sail boat at Wangi on Lake Macquarie. Unfortunately she passed away when I was two. She only us0ed black, white and a sepia colour. The painting is very dark but the more you look the light shines through. I now understand how she did it. Thanks for the enlightenment.
How amazing that your grandmother only used three colors. Also think it is so wonderful that you are carrying on such a rich artistic legacy in your family – I didn’t know that you grandma was also a painter. So glad that this article shed some light on how she made her painting. I personally find indirect painting methods so fascinating and interesting!
Thank you. Very clear. Perhaps you could do a simple demo on a small area of canvas that would go through the steps and bring out the translucent light effect. It might serve as a simple practical exercise we could have as a reminder.
Thanks for mentioning this Charles! I do want to do some demonstrations of indirect painting. I plan to do some demonstrations of it on my youtube channel in the future. There are a number of different ways of doing glazing and scumbling and look forward to doing a number of different demos. I agree – seeing it would serve as a good reminder.
Excellent and very useful article. Thank you!
You are so welcome! Glad this was useful 🙂
Great article. I always find glazing to be elusive.
Thank you for your kind words! Honestly I also felt the same way about glazing… it always sounded confusing and wasn’t clear as to what it actually was – I understand it much better now! And plan to talk about it more/ make videos on it. It is much more simple than I ever thought it was!
I admire the old masters for their skill and ingenuity with very few tools.
And also the use of very few colours to achieve amazing works. Nobody needs endless tubes of paint to achieve great work.
It is something I aim for, when I start in this medium.
Yes you are right on. It really isn’t necessary to have many many tubes of paint. Sometimes it can save time when it comes to mixing certain colors – but you do learn a whole lot more when you force yourself to simplify your color range.