


I love working with watercolor paints and learning more about painting in watercolors. This watercolor portrait tutorial, will help to show how to approach painting with watercolors for beginners. Even if one does not have much experience painting with watercolors – knowledge from other painting mediums can be applied to it.
The wonderful thing about painting is, that once you learn the fundamentals of painting. You can apply them to every medium you work in. So, even though oil painting is my primary medium. I can work in other mediums because I know and understand the basic fundamentals of painting.
What you will discover in this watercolor portrait painting tutorial
In this watercolor portrait tutorial I placed an emphasis on value because value is the most important element in painting. I started the portrait out (based on a figure from a Vermeer painting) in a monochromatic way by using one color to start out with.
Painting in watercolors and watercolor portraits work best, when approaching them in a very simplified manner. Don’t get too carried away by mixing a ton of different colors – especially in the beginning!
Just using one color to start the painting out makes it much easier to create a clear value structure. Once color gets brought in, being able to see value clearly becomes a little more difficult when painting with watercolors.
First look for the value shapes of your watercolor portrait painting

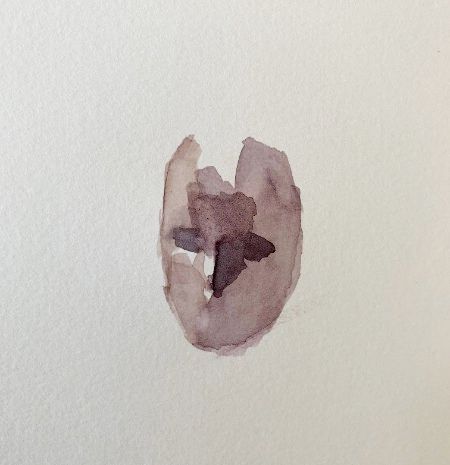
Like I said earlier, value is the most important aspect to painting. The same holds true and is important to realize, when it comes to painting with watercolors for beginners. Here I looked for the whole shadow shape that appeared on the right side of the face. I used only one color and one value tone to lay down a shadow shape for the watercolor portrait.
For the color I mixed together alizarin crimson with pthalo green to get the muted red color in the above example.
Finding the darker value areas while painting in watercolors

Next I search for where the darker shadow areas on the face of my watercolor portrait painting are. In the above example you can see how both eyes and the nose are engulfed in this darker shadow. I simply followed the specific shape of the darker shadow with my darker shadow color.
To get the shadow color for my painting in watercolors, I mixed up Alizarin Crimson with pthalo green and some ultramarine blue.
Adding a light and mid-tone value to the watercolor portrait painting
Now I add in a value on the forehead that is in between the lighter shadow on the right side of the face and the dark shadow along the eyes and right side of the nose. In addition, I put in a light color on the left side of the nose.
Now, I start to add a little more color! So, I am breaking up with the monochromatic color scheme. I mixed up Alizarin crimson with some pthalo green but added in some yellow ochre and cadmium yellow.
As you can see in my watercolor portrait painting, I am sure to leave the lightest areas white. In the example above you can see that I left the top of the nose area as well as the top of the forehead untouched from watercolor.
Layer more shadows on the right side of the face

One wonderful thing about painting with watercolors is that you can layer! The right side of the face needed to be made up of a darker shadow. So I mixed up a darker shadow color and laid it down on the right side. I left a small area under the right eye untouched – as this is a place where the light is hitting the face.
In addition, I layered a little bit of watercolor on the top part of the forehead – it was a little lighter of a color than what I used for the right side of the portrait however.
There is a hint of a mouth with that was created with the shadow color. In addition, I was able to soften the edge along the nose. It was a very stark line previously. I simply placed some water over the watercolor to ‘soften’ it a little bit.
Define the Hat and Edges in your watercolor portrait

Next, I move on to creating a hat for my watercolor portrait subject. I mixed a small amount of ultramarine blue with some ivory black to get a cool darker color and then painted a dark line around the top part of the subject’s head.
I add some water to my blue/ ivory black mixture and paint in the shadow area of the subject’s hat. More color is applied on the right side since the shadow area is darker here. In addition, I create a light line around the hat that suggests an outline.
Color and shadow shapes

Since the face of my subject is mostly complete I work on the upper body of my subject. It is important when painting with watercolors for beginners to simplify. As the medium is not meant to create very detailed work with.
So, I on the left side of the figure I created a yellow color shape as the individual was wearing a yellow shirt. There is a white cutout blouse in the middle – I simply left this area blank as you usually do whenever you come upon white while using watercolor.
Below the right side of the face is a shadow shape – again, here I used just one color to simplify and designate an area of shadow.
Completing the watercolor portrait painting

I continue on with creating simplified shapes for my watercolor portrait tutorial. By creating a dark muted shadow shape on the individuals yellow clothing on the right side. For the color I mixed cadmium yellow with yellow ochre and some ivory black. And voila! The watercolor portrait painting is complete!
How to know when your watercolor portrait paintings are finished
Your watercolor portrait paintings are finished when you feel like they have a completeness about them. Ask yourself if it has everything in it that you want? However when painting with watercolors for beginners, just remember that it is very important to keep your watercolor painting simple. You do not want to keep on adding elements. Rather, as you create your watercolor portraits be mindful about what to include.
Further recommended reading on how to paint with watercolors
Watercolor Painting Tutorial – Step by Step Painting Lemons – Experiment and practice further with learning how to paint lemons using watercolors.
11 Watercolor Tips – Useful watercolor painting tips that you can apply to all of your adventures in painting with watercolors.
Best Watercolor Paint Sets – Here I go through and list some of the top watercolor painting sets, for varying skill levels and budgets.
How to Paint Clouds in Watercolor – Painting clouds is one of my favorite subjects! This tutorial is a great practice for working on painting clouds specifically. Which could then be applied to landscape painting with watercolors.


8 thoughts on “Watercolor Portrait Painting Tutorial – Painting with Watercolors for Beginners”
This was so very helpful. Thank you Elizabeth.
If I wanted to define the features of my subject would I be best to also work with a color pencil for eyes, lips etc.?
So glad to hear that this was helpful! Yes, you could use watercolor pencil for features you want to define more. You could also get very fine/ small brushes to work with in small areas. You could experiment with both and see what works best for you.
I’m curious, could you elaborate on how the technique of layering and glazing used in watercolor painting is similar or different to the process in oil painting? Can you discuss the unique challenges that beginners might face while transitioning from oils to watercolors? 🙂
Hi Kristina, Layering and glazing are quite different between oil paint and watercolor. The concepts are the same – but the applications are different mostly because watercolor is a transparent medium and oil paint is mostly opaque – though also transparent but in a different way. So, when it comes to layering, it can be better to work from light to dark with watercolor – laying down the main values but then making the dark values increasingly darker. One challenge I personally faced was not making my dark values dark enough with watercolor – as they dry lighter. Layering by making your values increasingly darker will help you achieve the right values and learn more about how watercolor behaves.
I hope this helps! 🙂
ערב טוב אליזבת
תודה על ההדגמה פניתי הבוקר לבקש ממך ציור פרוטרט בצבעי מים דוגמה במבט שלושה רבעים
מצאתי הסבר שלך
תודה רבה מועיל מאוד
בהערכה רבה
רותי כהןן
שלום רותי יקרה,
תודה, אני שמח לשמוע שמצאת את ההדרכה שלי מועילה. משמח אותי מאוד לשמוע את זה!
I have just started to learn how to use watercolors. I enjoy mixing different colors but find I never have enough room on the palette.
If I am going to learn to paint out of doors, how can I mix so many different colors on a small palette.
Any suggestions.
Hello Madge – that is a great question! One thing I do is wipe down my palette routinely during a painting session to make space for more color mixing. Another thing you could do is bring an extra plastic palette with you (plastic since it will be lighter to take with outdoors).