I am fortunate to have a few rose bushes in my backyard. Unfortunately…a few of the bushes suffered under large falling tree branches from storms earlier this spring! So when I saw that I had a beautiful rose for painting just sitting there. I was delighted and couldn’t help myself but pick it before it wilted. Now I get to share my experience of painting a rose, to hopefully help inspire and teach others how to paint a rose!
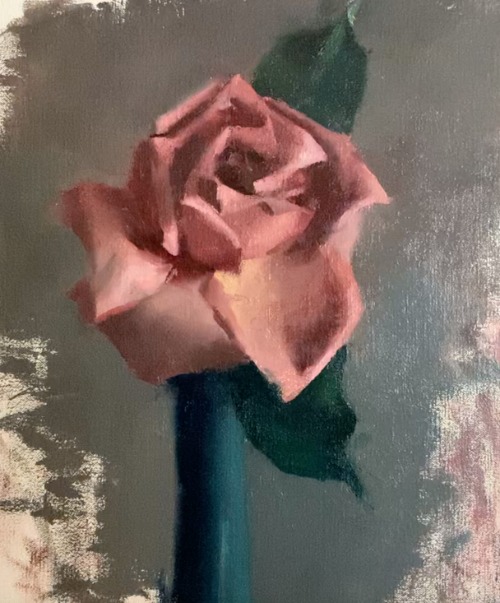
Many people are interested in learning how to paint a rose but sometimes give up out of frustration. I created this painting a rose tutorial to try to help make learning rose painting easy. By showing that how to paint roses (or flowers in general) is all about finding value shapes and simplifying. It is also critical to pay attention to subtle shifts in tone and value.
How to paint a rose video tutorial
Watch the video to see how to give your rose painting a strong light and dark tonal structure. Then see the exact steps I take to get the colors and values needed, by reading the written tutorial (with image diagrams) below!
How to start your rose painting
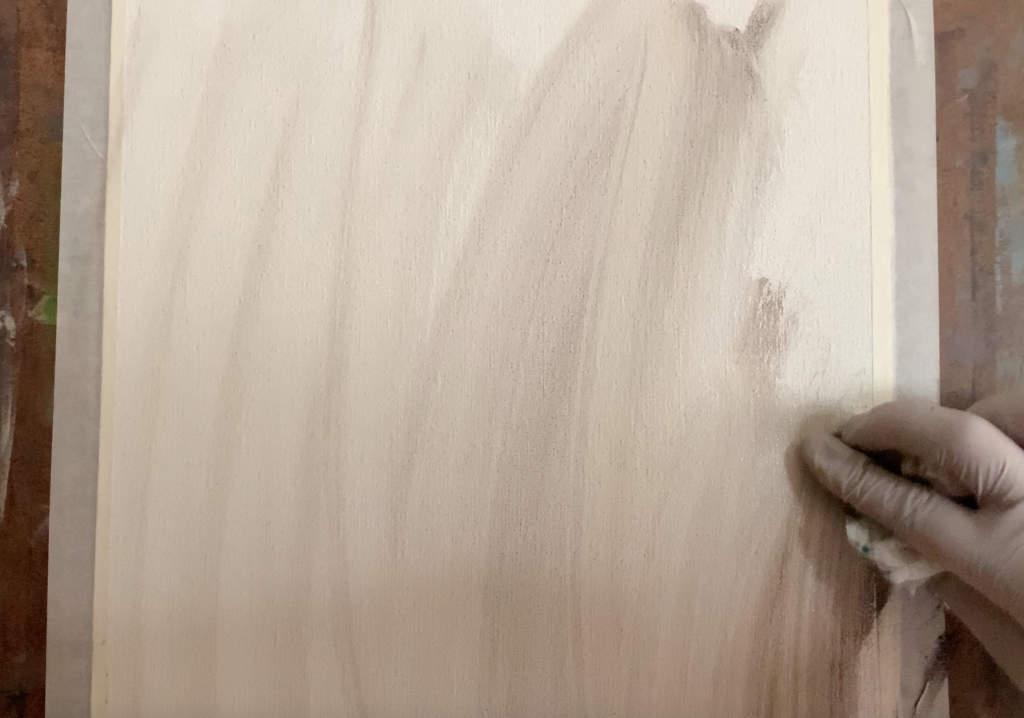
Start learning how to paint a rose by creating an imprimatura on your blank canvas. If you are not familiar with the term, an imprimatura is a toned ground. It is best to start your painting on a toned ground as this will help make figuring out the values of your painted rose easy right from the beginning.
Sketch out your rose painting
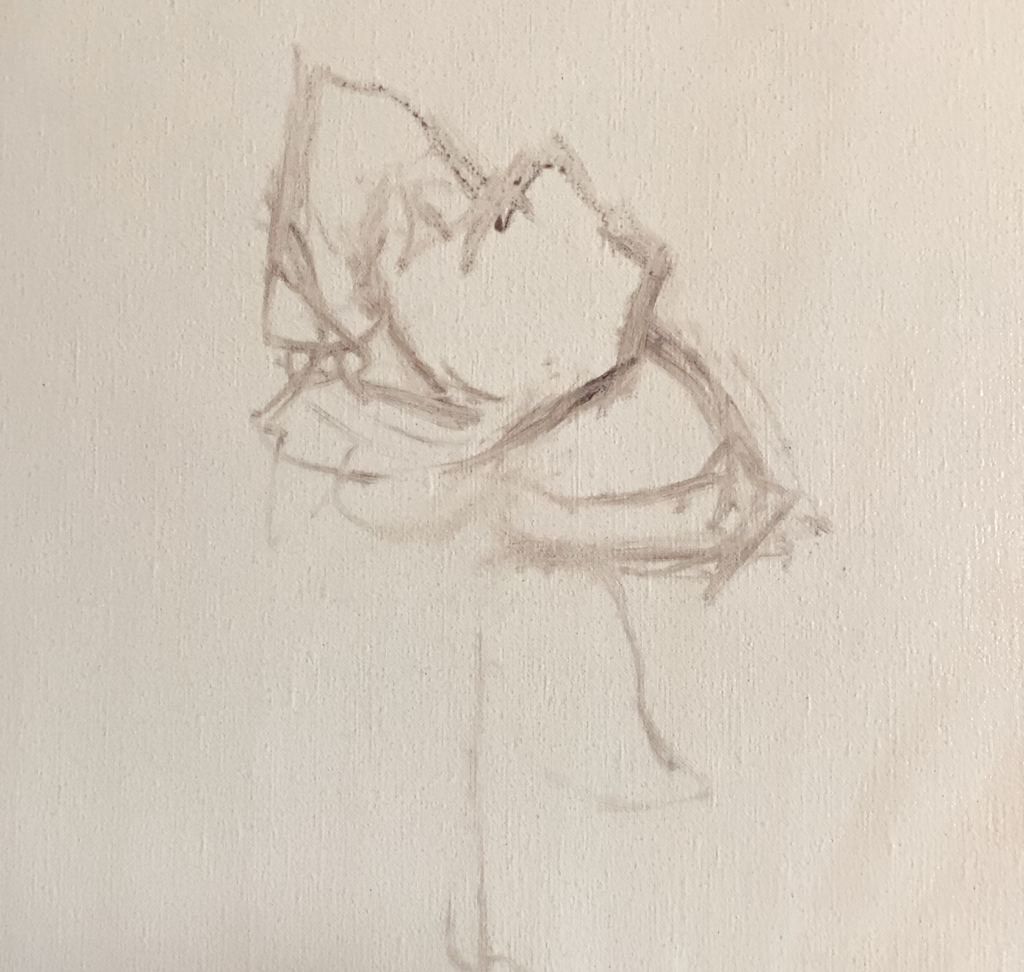
After creating your toned ground on your canvas you will then turn to sketching out your painting. Use a short stubby brush as well as a small amount of the ultramarine/ blue mixture you used for your imprimatura.
This sketch on your canvas is not meant to be a completely accurate drawing. Rather, you are trying to get the general architecture of your subject as well as figure out the precise composition.
A painting sketch is meant to be adjustable
As you start painting a rose and continue to work, you will be able to make easy adjustments to your rose painting where they need to be made. So, if a measurement is slightly off – that is ok! You can simply paint over it and readjust. A sketch on a canvas should not turn into something you ‘fill in’.
Putting on the first spot of color
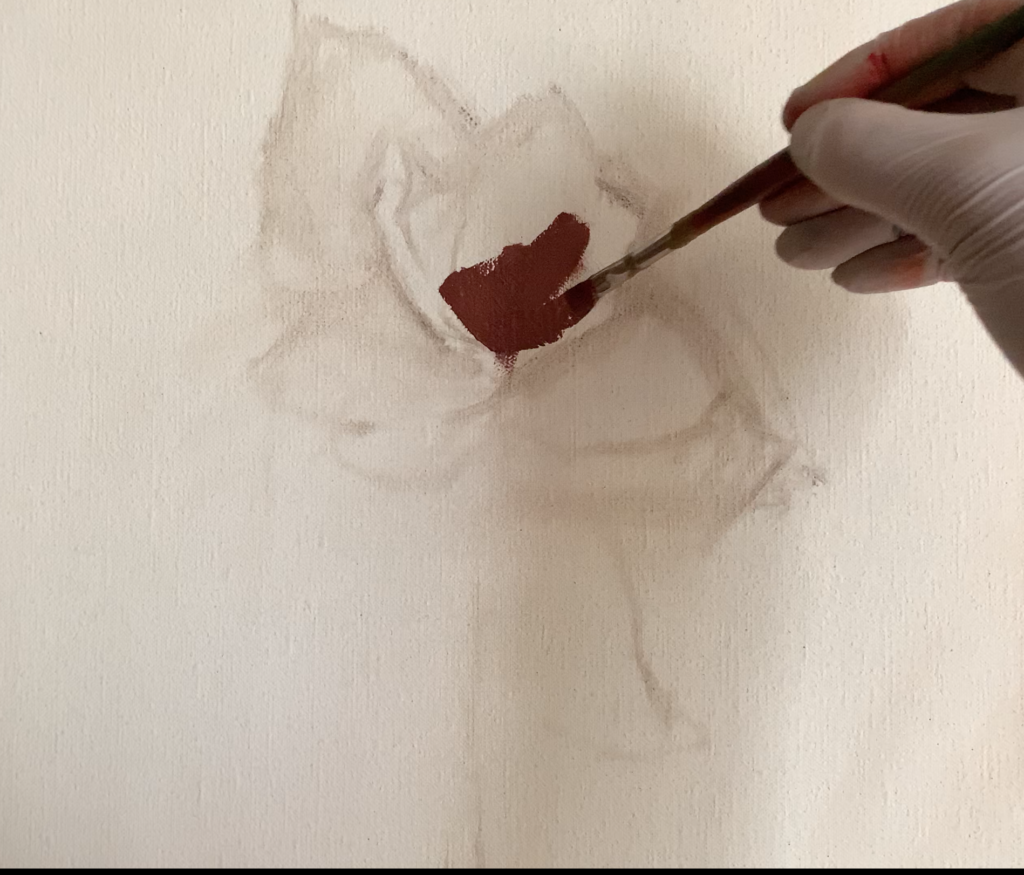
Now, in this stage of learning how to paint a rose, it is time for your first spot of color! I decided to start at the center of the rose and create a mixture of alizarin crimson, pthalo green, with some ultramarine blue and a small amount of white. You can use my free color mixing guide here for help with applying these color mixing techniques.
To start out I found a simplified dark value shape to paint. It is important to not focus on details – especially in the beginning. This will detract from getting the big picture elements into the painting.
Painting a rose with a contrasting light color
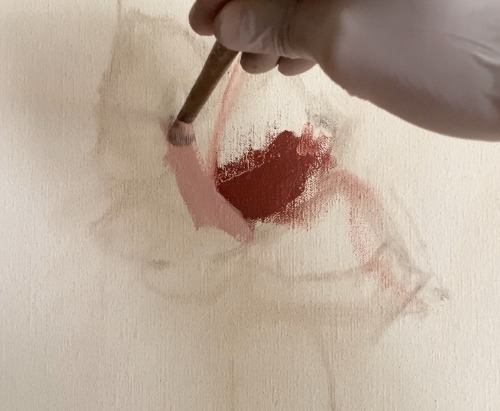
I want to focus on getting a sense of light and dark right from the start in my painting of a rose. Since I already put down a dark spot of color. I turned my attention to mixing a lighter color, that will be placed right next to my dark spot of color to create some contrast. I mixed together alizarin crimson with cadmium green and a little bit of white to get the light slightly muted pink.
Mix a transitional color for your rose for painting
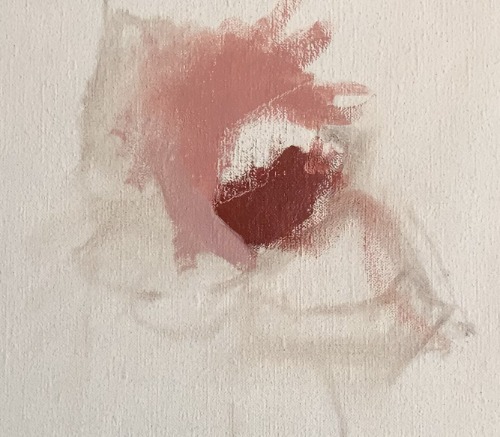
I then turn my attention towards creating the transitional color for my painted rose. This will be what the lighter pink area turns into by mixing alizarin crimson with some cadmium green. It is a subtle change that will be more important later on.
Creating Dark Value, Medium Value, Light Values
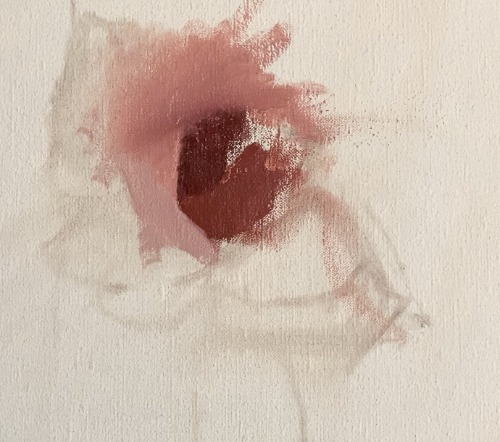
As stated in a previous step, I always want to get a sense of light in the painting right from the start. In learning how to paint roses this is one of the most important steps!
I create light in the painting by starting my painting of a rose with a light value, dark value and a medium value. You can see in the image of the rose painting, that my darkest value is placed above my medium value – the shade of pink/red color.
Since I have dark, medium and light values now converging together I have a sense of light in my rose painting. So it is a good, promising start!
Expanding beyond the inner part of your rose for painting
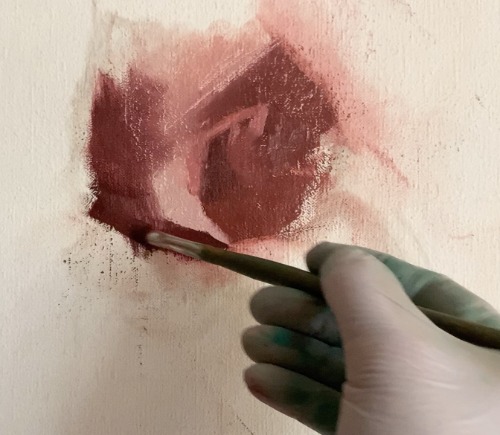
Now, I go beyond the center of the rose and paint in some dark petals on the outer margin.
I also work on the center of the rose in more detail by painting some lighter areas of rose petals.
How to paint a rose by creating edges
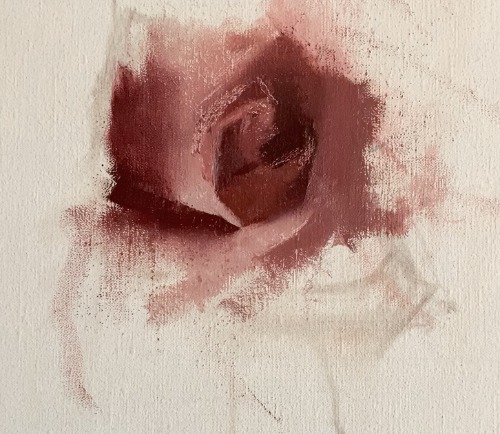
I work at paying attention to the edges of my rose for painting right from the beginning! It is important in our learning how to paint a rose here, to create soft edges where they are needed and sharp edges where they are appropriate.
Edges in painting help to create a sense of space in a painting. Notice in the image of the painted rose above, that there is a great variety of painted edges already. The sharp edges create a sense of distinction while the soft edges allow the colors to blend more.
Search for simplified shapes when learning how to paint roses
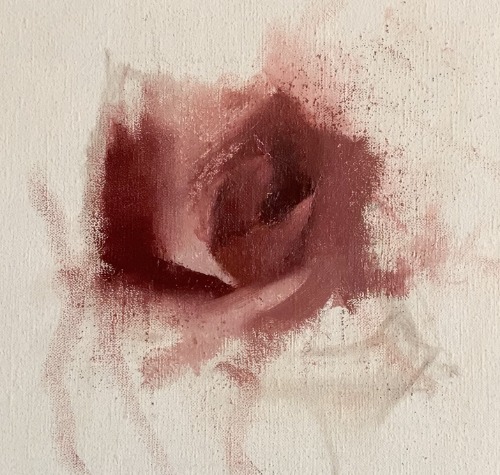
The center of the rose oil painting is now starting to take more of a shape. I continue to work at forming the center of the rose more by finding simplified and important value shapes. Fun tip – a view finder is a great tool for narrowing down focus and finding simplified shapes.
How to paint a rose by simplifying each rose petal
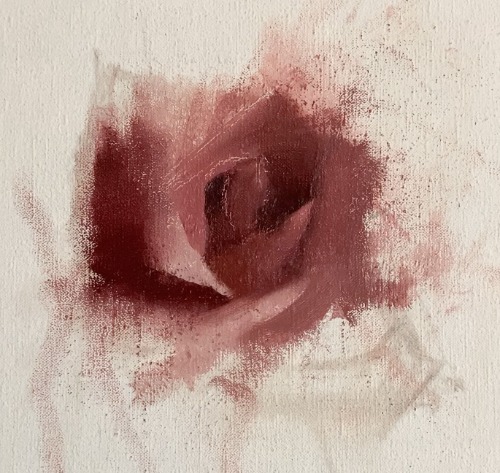
I look at the general color and value of each petal and see how I can simplify it.
At the center of the rose painting I found a lighter pink petal shape that needed to be painted in. In addition, I found a dark spot next to the lighter pink rose petal.
Creating distinction within the rose petals
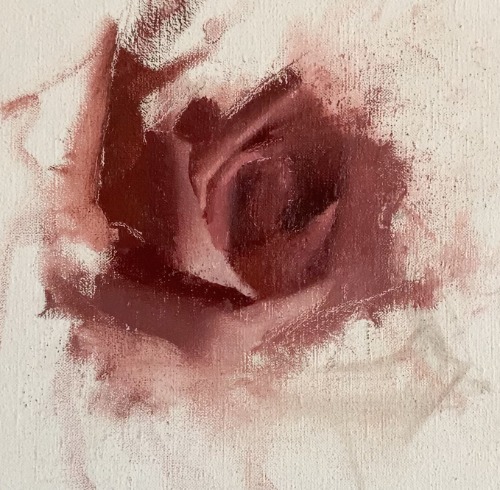
As I mix up the colors for the rose petals of the painting. I pay most of my attention to the values of the colors. If you haven’t already – Grab my FREE Color Mixing Guide for additional help with color mixing techniques, that you can apply to your rose painting!
I create a shade of light pink to add a highlight to the petals of my rose for painting, which were much brighter. Also, I mixed up some shadow colors for a lighter colored petal at the bottom side of the rose painting. So, I mixed up alizarin crimson with pthalo green and a tiny bit of white to get the shadow color.
Adding even darker values to the painted rose
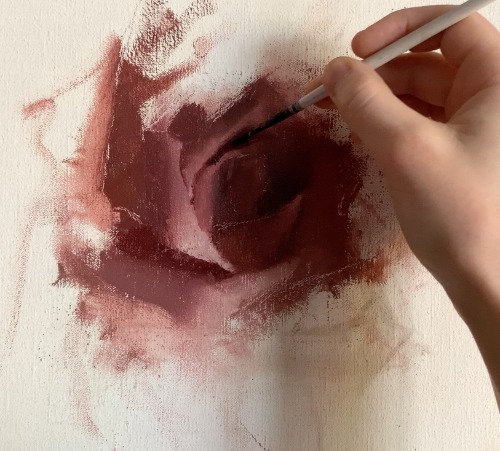
In the same way I paid attention to the lighter areas of the rose, it is important not to forget the dark areas of the rose for painting as well. When painting a rose, these shadow areas help to bring solidity. As the dark values make strong statements and help to create a clear value structure in the rose painting.
Notice in the image of my painting of a rose above, that I painted my darker shadow color in between the rose petals. Creating distinction, as well as depth in the painted rose.
Painting a rose with dark value shapes to help create form
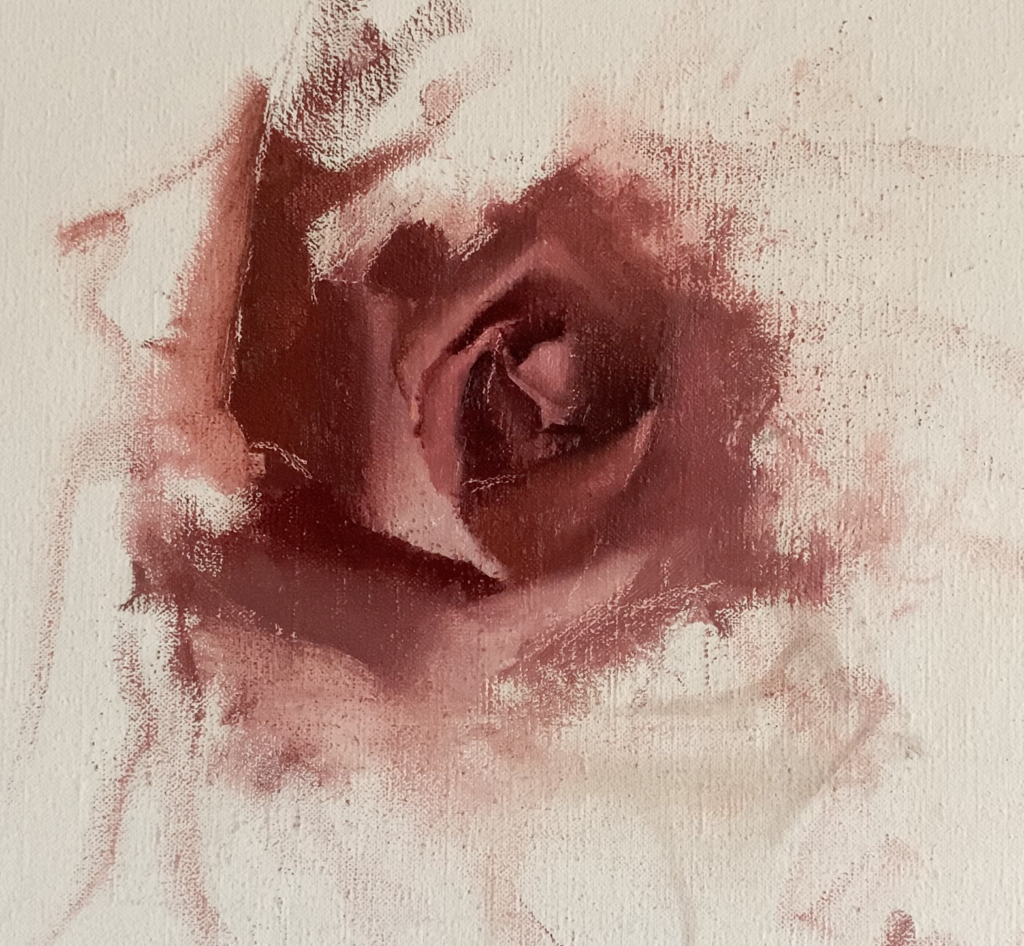
Here you can see that the dark value areas helped to form the shapes in the center area of the rose. We can now see the very center of the bud as well as notice some of the other petals in the center area.
And again light pink is used to ‘pull out’ some petals and help them to stand out when painting a rose. For example I painted the tip of the center bud as well as a petal that is rolling out. As a result these petals stand out so much more.
How to paint a rose that changes & how to make adjustments
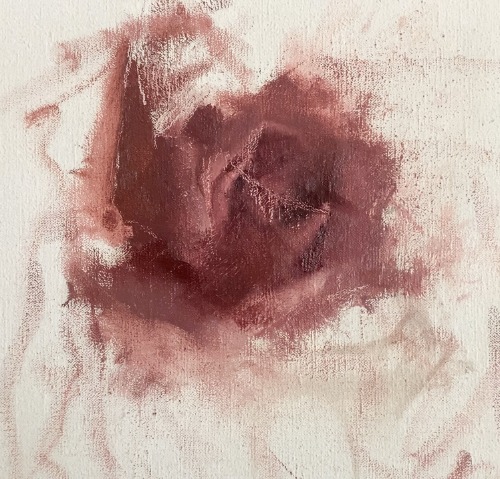
Due to time restrictions I was not able to complete my painting of a rose in one sitting. Unfortunately my rose changed drastically when I returned to my painting the next day!
As I made the decision to paint the changes I saw in the rose here is a good example of how to revise a painting based on changed circumstances. This decision required me to make some drastic changes as I had to rework almost everything I did before.
It is hard to paint over and get rid of hard work – but the product is not what is important. Rather, it is more important to focus on the process of how to paint a rose and the real goal you are after with your painting.
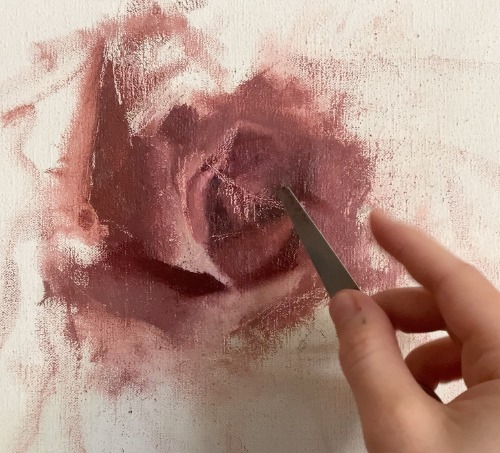
Using a palette knife to change the rose
I used my palette knife to simplify and wipe out areas that changed in my rose painting. It can be difficult to get rid of some work – but it is also important to not be too attached and rather work towards the goal you have. Working with how to paint roses is by the nature of it, an ever changing experience if you will be painting the same roses for any extended period.
Finding general shapes at the center of the rose painting
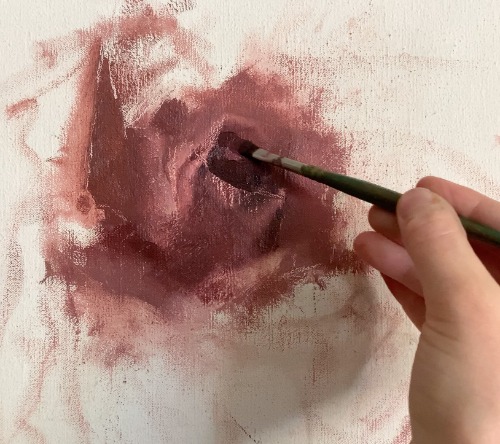
I start reworking my painting of a rose in a very similar way to how I started my painting in the first place. I search for simple shapes at the center of the rose painting. Here I find a strong dark value color.
Marking out lighter rose petals
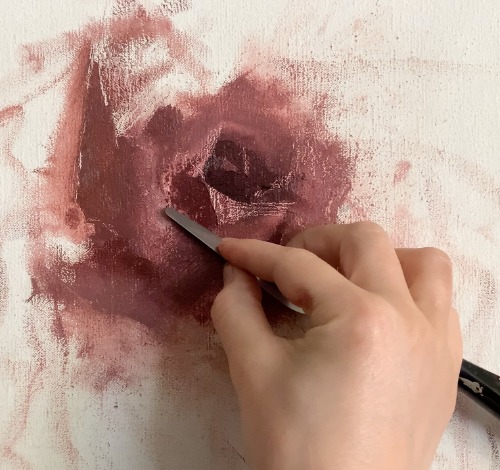
In addition, I look for shapes that are lighter and deliberately make them lighter by scraping away paint with my palette knife. Also, I also emphasize the lighter areas by painting the darker value colors that appear around the lighter petals.
Painting lighter rose petal shapes
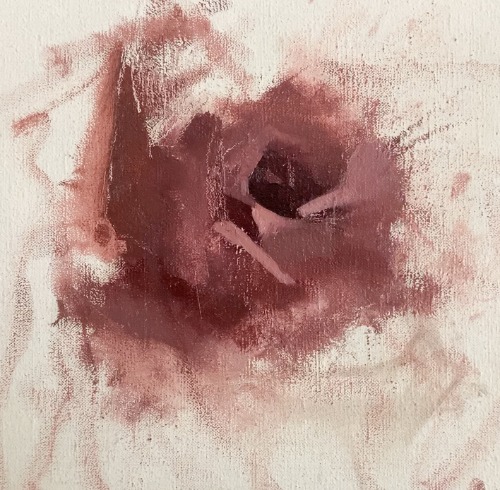
As I want to create a clear value structure in my rose painting I paint in the light colored rose petals that appear amidst the darker pink color. This helps to establish clear light and dark values.
I mixed together alizarin crimson with cadmium green and a little bit of white to get my light pink color. If I just mix alizarin crimson with white then I get a very bright pink color. To mute the bright pink color I mix in a little bit of green to mute it.
How to paint a rose by creating additional shape and structure
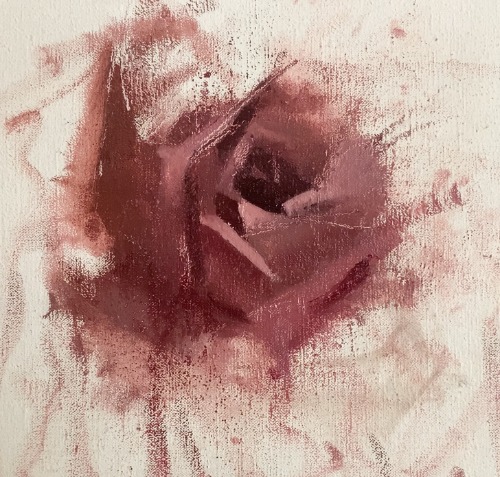
I continue to find clear shapes within the rose by following the petals around the rose. Some petals are light while some are in shadow. The light parts of the petals are typically the top areas of the petal – or the end of the petal. The darker areas of the petal are deeper inside the rose.
It is not just sharp and soft edges that help to give a sense of space to a painting. But having clear values also helps to create space in a painting. So, continue to pay attention to your values throughout the process of painting a rose.
How to paint roses with subtle color and value changes
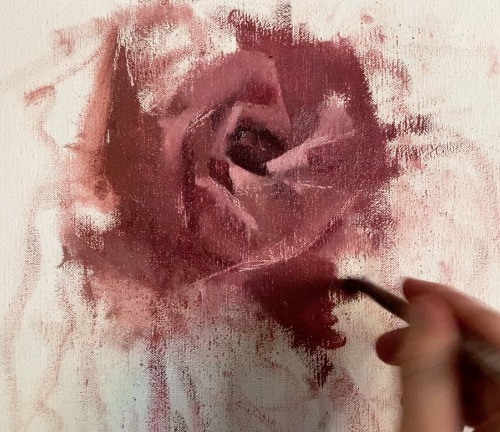
Painting roses is a lot about capturing the subtle color and value shifts that happen. Look closely and pay attention to the subtle color shifts that appear in your rose for painting. While at the same time not losing the big picture and sense of dark and light.
How to paint a rose’s outer rose petals
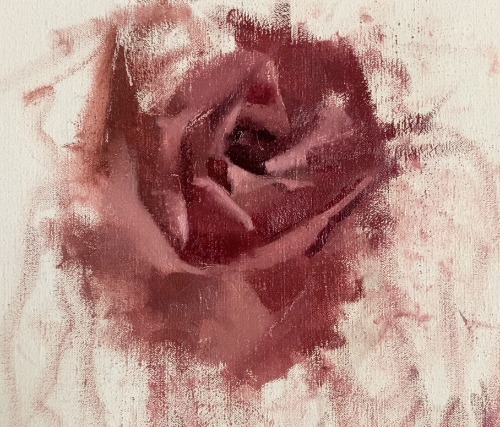
Now that the center part of the rose painting is more developed, I will turn my attention to painting the outer petals of the rose.
I paint in some lighter parts of the rose petals while also searching for the subtle shadow changes on the rose. In addition, I also create some sharp edges by marking out some clear edge lines with darker colored paint.
How to make rose petals stand out with dark values
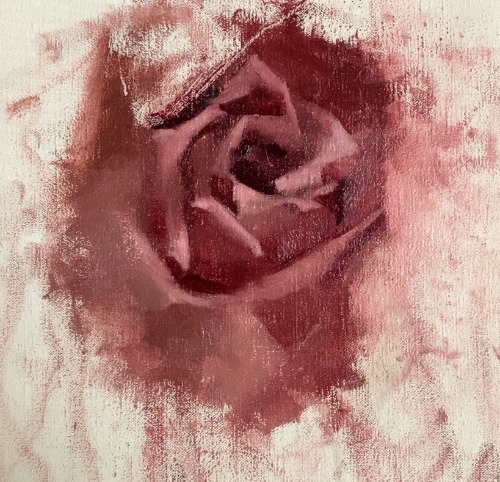
I paint in some dark red-pink color at the upper side of the painted rose. This darker color helps to make that rose petal stand out more as it creates a sharp edge. Whenever a light color is set against a dark color, then a sharp edge is created.
I use the dark red-pink color in a similar way in other areas around the rose painting. Making use of dark colors in this way makes rose painting easy, as helps to make your painting more realistic with clear edges.
How to paint a rose by introducing new colors to the outer petals
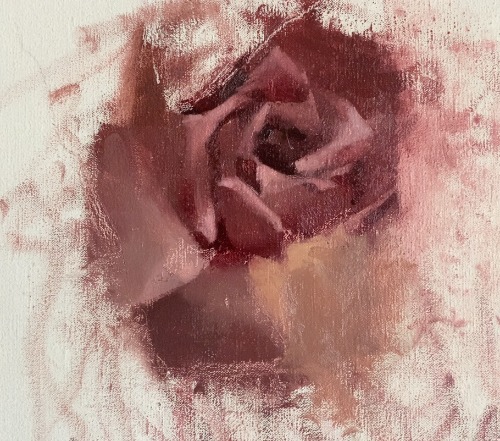
As I paint the outer petals on the rose I introduce some new colors! As you go through your journey of how to paint a rose, you will notice your rose for painting go through different stages. Often when a rose is at its last stage of blooming it can have different colors along the outer petals that are about to fall off.
My rose I used for painting is at its final stage here, so one of the outer petals is a yellowish color. I worked on developing the outer petal next to the yellow petal by darkening the shadow area of the rose petals.
How to paint roses with simplified shadow shapes
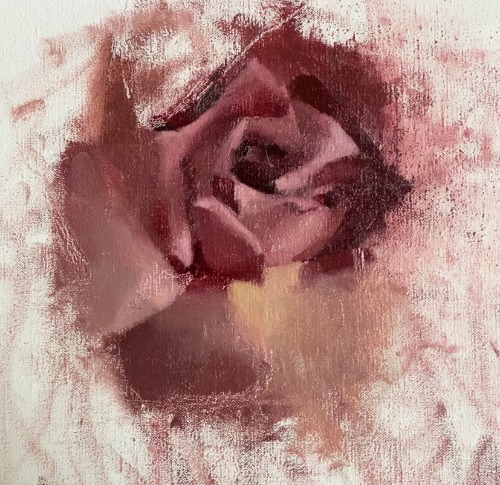
Throughout the entire process of painting the rose I continually search for simplified shapes. I found one simplified dark value shape on the right side of the rose.
In addition, I created my dark value color shape by mixing alizarin crimson and pthalo green together.
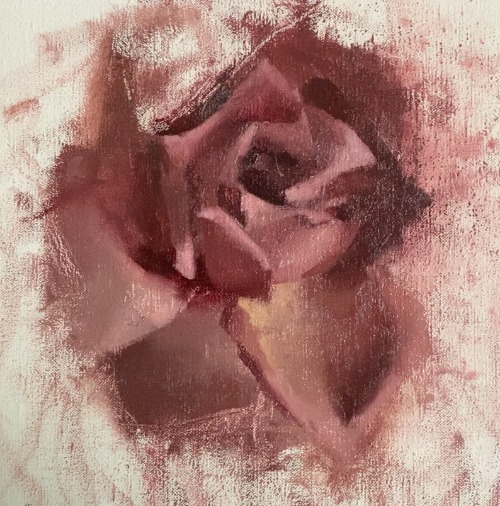
After creating a lot of simplified shapes with the flower petals I work on developing the rose petals further. I paint shadow areas within the yellowish petal and mark out where dark and light areas are.
Painting in the background of our rose for painting
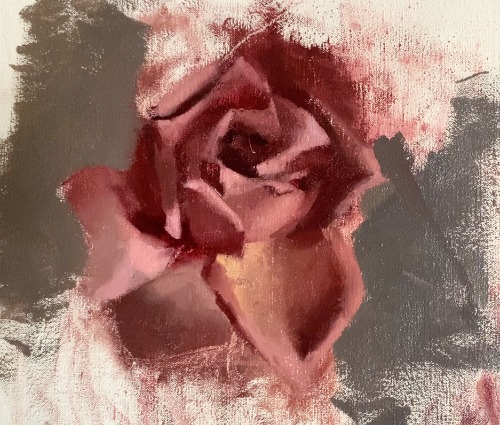
Now it is time to paint the background of our rose for painting! I like to paint the background and my subject both at the same time as I am more able to make the background be part of the rose. Otherwise, the rose might run the risk of looking like a ‘cutout’ flower.
In addition you can create soft edges and sharp edges more easily between the flower and the background if done at the same time – especially as the paint is still wet. If all the edges around the rose are the same against the background it will look unnatural.
For the background color I mixed ultramarine blue together with cadmium orange and a little bit of burnt umber.
Creating different shades of background colors
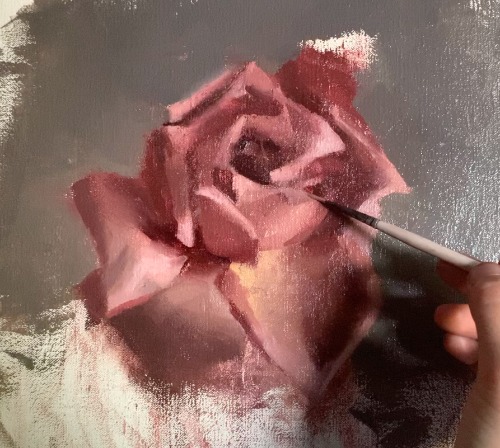
The background will never be just one color. Even if your background is just grey, as this one is, it will consist of a variety of different shades of grey.
Be sure to pay close attention to your background and be sensitive to what areas are lighter, darker, cooler and or warmer.
I also work on the smaller details of the inner part of the rose by painting in a more accurate color.
How to paint a rose’s leaves
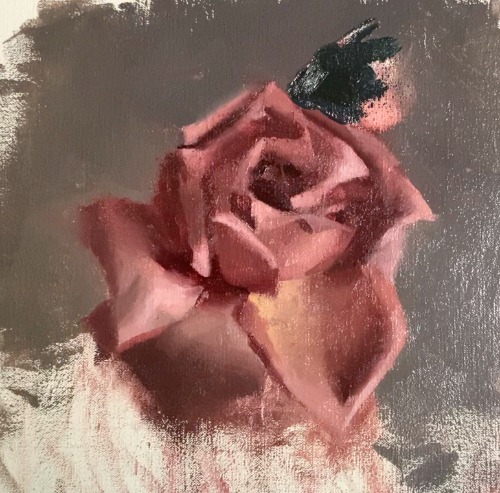
A Rose can’t be painted without it’s leaves 🙂 I start to paint the leaf that appears on the upper right side of the rose. For the leaf area I mix together pthalo green, alizarin crimson, with some cadmium green.
Adding shades of color to the rose leaves
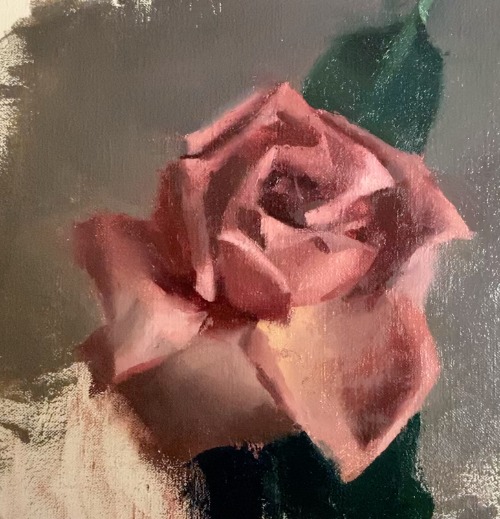
It is important when painting a rose, to create a variety of different shades of green for its rose leaves. For the lighter parts of the rose I mixed in cadmium yellow with my pthalo green/ alizarin crimson mixture. I sometimes added white if I needed to make it even lighter.
For the darker leaf area at the bottom part of the rose I mixed together pthalo green, alizarin crimson and ultramarine blue.
Painting a rose in completion

Before completing the painting of a rose, I paint in the vase that is holding my rose. I painted the right side of the vase a dark shadow color and the right side light to show the distribution of light and dark.
The things I consider before completing my painting are making sure that a sense of space is present. Are the elements in the background receding back in space while the parts of the painting in front coming forward?
In my rose painting I can see that the edge of my leaf on the top part of the rose has a soft edge and as a result recedes back in space. Conversely, the rose petal at the front of the painting has a sharp edge and comes forward.
Find a rose to paint!
Now it is your turn! Find a rose for painting – either a garden rose or one from the store and try your hand at painting it.
How to paint roses is a great lesson in simplifying and finding subtle color shifts. You will doubtless gain a lot from the experience!






6 thoughts on “How to Paint a Rose Step by Step Tutorial”
Hi Elisabeth,
It seems to me that you like dark colors. Classical old masters school. Perfect. To refresh it I would have added few tiny drops of water to give the rose some freshness. If you do that may be Holbein will turn in his grave!
Just joking. Paul
Hi Paul, I do try to use a good amount of darker colors as this allows me to work with very rich colors and get strong light and dark contrasts as well. The rose I was painting from here was half dried – there is something about dried flowers that is very interesting!
Going to try your method. Love your rose!
Thank you! Glad you are going to give it a try 🙂
Thank you for this Free instruction Elizabeth! I love your paintings, so it is amazing and stimulating to see just how you “work your magic”! The Rose is lovely with just a touch of mystery!
Rose S.
🌹
You are welcome!! Thank you so much for participating in reading and seeing the process images – appreciate it greatly 🙂