


We all love seeing the water and watching the waves crash and move towards the shore. However, when it comes to how to paint the ocean, it can feel a little bit puzzling knowing how to approach the fast moving water and waves.
How do we paint something that never stands still??
Here, I will show you how to approach an ocean painting in this step by step tutorial.
Watch the video tutorial here – and then keep reading for full written tutorial with process images just below!
Grab a prepared painting surface
For my seascape painting I use canvas from an unsuccessful previous painting that was wiped and scraped out. It is always good to reuse painting surfaces of paintings you would normally throw away. If you don’t have a canvas to paint over be sure to create an imprimatura on your white painting surface.

Start Painting the Ocean Sky

Something that will make ocean painting easy for you is to start with the sky!
The sky is the most important part of any landscape or seascape painting. Therefore, we start our painting with the sky. The great British landscape painter John Constable once said, “…The sky is the source of light in nature and governs everything.” The sky is what determines the kind of light the rest of the seascape will have.
How to mix the sky color
I begin by mixing a small amount of ultramarine blue and pthalo blue with a good amount of white. Then, I mix a very small amount of cadmium orange to mute the blue colors (since blue and orange are complementary they mute each other when mixed together).
If I were to mix just the blue with the white then the color would be far too bright. Therefore adding a very small amount of orange to the mix mutes the color just enough to make the color more natural.
Mixing Darker Ocean Sky Colors

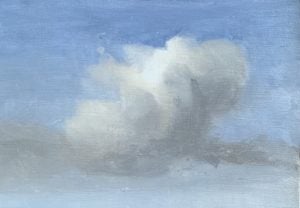
With the initial bottom part of the sky done I now transition into painting the upper portion of the sky. Usually a sky gets gradually darker the further away one gets from the horizon line.
In the upper image I mix a slightly darker color for the middle portion of the sky. I mix more blue with my previously mixed up color and add in a small amount of orange to mute the color a bit. The change is subtle just as the changes in the sky are slight. Therefore, it is important to be aware to just mix in small amounts for the color changes.
Creating Space in the Sky

A great ocean painting easy tip is to paint the top part of the sky darker than the bottom part
Let me elaborate: The top part of the sky is closer to you than the part of the sky that is down by the horizon line. Therefore, making the color of the top part of the sky more saturated, brighter and darker in value will make that part of the sky feel closer to you in space.
Notice in the painting below how the top part of the sky is closer in space than the bottom part. This is all a result of painting the top part slightly darker in value and using more saturated color.

How to Paint the Ocean
We now approach one of the exciting parts of this ocean painting tutorial! Learning how to paint the ocean and its waves.
Mix up a blue color with ultramarine blue and small amount of pthalo blue. I use more ultramarine blue than pthalo blue for the water in my painting. However, depending on where you are in the world the water could be an entirely different color. Trust your eyes to observe your colors closely and mix the colors that work best – this will make ocean painting much easier!

As already mentioned I start by mixing ultramarine blue with white. This time I use much more blue than I did for the sky! However, the color for the water in the above image is too dark and muted. Therefore I mix a little more pthalo blue into my blue mixture to brighten the color a little bit. I also mix in a very small amount of cadmium orange to mute the color slightly.

Notice how the blue of the water looks much better now as it is brighter and fits in with the sky. It is important for the sky and water to be congruent.
Ocean Water and Color Temperature
Another great ocean painting tip that is easy but VERY impactful, is to pay attention to color temperature when painting water. Warm colors come forward in space while cool colors recede back in space. In other words making the area of water that is further back cooler in temperature will make it feel far back in space. If you make the area that is in the front part of the water warm in temperature it will feel like the area is coming forward.
Since a seascape can sometimes deal with many of the same colors (mainly blue) the changes will of course be subtle. That is why it is all the more important to pay close attention to color temperature and know how to use it!

In the above image I mix a second shade of blue below the first stripe of blue I put down earlier. I mix a warmer shade of blue by using more ultramarine blue than pthalo blue. Ultramarine blue is a warmer blue than pthalo blue because it is closer to the color purple.
Color temperature might feel a little confusing at first but once you put it into practice you will get the hang of it!

I mix a third blue color that I apply below the second shade of blue. This third blue color shade is lighter in value as well as a little bit warmer.
To make it warmer you can either use more ultramarine blue for the color or mix in a little more red to the blue. And to make it lighter in value simply mix in more white. I personally use lead white as the color will become less pasty than when using titanium white.
How to Adjust Your Painting
There may come a point when you look at your painting and notice that something is not working as well as it should! My painting needs a little changing with the sky. The sky in general is too light in value and therefore needs to be a little darker and more bluish.

I mix up a slightly darker color for the horizon line area of the sky by mixing a small amount of pthalo blue and orange with a good amount of white.

Then I proceed to make the rest of the sky gradually darker as seen in the image above.
Painting Ocean Waves
Painting ocean waves might feel a little intimidating or daunting at first. Especially if you are painting from real life as they are constantly moving and ever changing. This is why painting ocean waves requires working from your imagination just a little bit.
I will show you the principles you need to know to make waves look like waves. When you know and understand the fundamentals you can make whatever waves you want! 🙂

To start out painting waves I mix up a lighter blue by mixing in a little bit of white into my previously mixed up blue color.
After I apply my lighter blue color to the lower section of my water I soften the edges with my palette knife. That means that I place the flat side of my palette knife onto my painting and make the transition between the different blue shades very soft and subtle.

Soft and Sharp Edges Create Waves
Ultimately soft and sharp edges are what will create waves in your painting. So, it is very important to know how to use them effectively.

To start my first wave I first mix up a darker blue color by mixing more orange into ultramarine blue. However, I still add some white to my blue as it would otherwise be far too dark in value.
I paint my darker blue color to the upper portion of the water. Then, I grab my palette knife and scrape away a little bit of paint below the darker blue area. Doing this helps to create a sharp edge.

With a paintbrush I grab some white and mix the smallest amount of white into it on my palette. I apply this very light color beneath the dark blue color. You can now see the first ocean wave forming!

However, painting waves is all about soft and hard edges. Before working more with hard edges I need to create a lot of soft edges. Therefore I soften the edges of the whitish paint I just applied in the previous step.

I move further down the painting and start painting a second wave in a similar way as the first

It is important to remember to soften your edges when painting waves. If you observe waves out at sea you will notice that a portion of the wave has a smooth transition between it and the rest of the water. Another part of the wave of course has a strong contrast – but we will get to that later! 🙂

I paint in the rest of the painting by applying some light blue to the bottom part of the painting. Notice that the lightest part of the painting is just above the very bottom. This is because I plan to create a wave that is just above the bottom edge of the painting.
Painting Ocean Waves to Stand Out
Now I start with the fun part of painting sharp hard edges which will help to make the ocean waves stand out!
To begin I apply a very light value white beneath the dark blue area at the upper section of my water. I soften the edges at each end of the wave just slightly. However make sure that the lower middle section of the wave is a sharper edge.

When my first wave is complete I move on to painting a second wave beneath it. Again, I apply a very light bluish white. This wave will be a small wave and will leave it as a subtle lighter area. It is good to create a variety of different waves. You see waves of all different shapes and sizes in the Ocean!

I save the largest wave for the bottom part of the water as can be seen in the image below. This helps to create a more believable sense of space in the painting. When larger objects are in front it makes it feel closer to the viewer. In contrast, smaller waves will recede further back in space.

Notice that the bottom part of the large wave in front has sharp edges. The upper/ back part of the wave has soft edges. Using edges in this way helps to make them more dimensional and believable.
Completing your Ocean Painting

I mix up a muted and darker blue color and apply a small amount below the bottom part of the large wave in front. Painting some dark color to against the light waves helps to create a stronger contrast and sharper edges. As a result it has more dimension and comes forward.

As I wrap up the painting I add some very light highlights to the large wave in front. This helps to emphasize that area and make it the focal point of the painting.

Before completing the seascape painting I extend the large wave further towards the left edge of the painting. It helps to create more interest in the piece!
Seascape and ocean painting is truly a mix of observational and imaginary painting. You can have a lot of fun with painting seascapes when you use the fundamentals of painting, as the sky is the limit with what you can paint!
Making use of the basics of painting is what will bring your painting to the next level and help you to create realistic and convincing seascapes. Here are even more seascape painting tips that demonstrate how to look for shapes and edges when painting ocean waves and more!
Scroll down and leave me a comment about what you think about painting seascapes! What do you love about them, what do you struggle with the most?
Want to remember this? Save How to Paint the Ocean to your favorite Pinterest board!


12 thoughts on “How to Paint the Ocean: Step by Step Ocean Painting Tutorial”
Great demo! Hugely appreciated and helpful.
Thank you! Glad this was helpful!
Terrific tutorial, many thanks Elizabeth. You make it look not too daunting to attempt.
cheers
Lesley
Thank you! Am happy to hear that Lesley!:)
Thank you. Very interesting and useful!
Happy to hear that! Thanks for sharing 🙂
Thank you, Elizabeth! As a 1 year beginner, this video is very helpful. I’ll be at the “Jersey Shore” in two weeks and hope to do some ocean painting!
Hi Pam! Am happy to hear this was helpful! And have a wonderful time at the Jersey Shore painting! 🙂
Thank you for this. Somehow you knew I was about to start an ocean painting and was searching for information and tips – afraid to start. Now I have the starting point – sky, from light bottom to darker top. This makes so much sense – I have always started at the top with the dark and got lighter as I went down the canvas and of course it is trickier to lighten a dark colour than darken a light colour. Amazing how one simple tip can solve a difficult process. By the way I am 92 years old and still learning from you young folk. Keep the lessons coming. Love you Elisabeth from another Elizabeth.
Wonderful to hear from a fellow Elizabeth! 🙂 Am very glad that the simple tip of starting with the bottom light part of the sky helps. It is true that sometimes the simplest things really help to move us forward the most. I wish you much luck with your seascape painting! You can count on new lessons coming out 🙂
This was a wonderful tutorial. I was able to follow and understand. I majored in art and painted for many years and loved. Then an injury prevented me from painting for a very long time. Now at 77 yrs old I’ve decided to try to paint again. I’ve been studying all tutorials that I can find. Yours was wonderful. Uncomplicated and enjoyable. Thank you from a very appreciative second time around student.
Thank you for sharing that Gloria. Am so glad that you enjoyed the tutorial and that you are returning to painting!